

After cutting a full coil off of the springs I estimate it dropped about 2-2.5 inches. Not quite what I was hoping for. I think 3 inches would be better but its ok, the cutting is only temporary until I buy the drop springs.
Before I was able to remove the springs for cutting I needed to seperate the ball joints. This process took me some time. FYI, ball joints that have been resting in place for over 40 years do not part so easily. It took me about 3 weekends of trying finally pop it. It also cost me my first city "Official Notice" due to the fact that I left the front of the truck on jack stands for that period of time.

I was told by many folks in the chevytalk.com forum that by using the pickle fork to seperate my ball joints I would most likely damage the ball joint dust boot. Thats perfectly fine right? I can always buy a new one.... WRONG!!! I looked high and low for a matching one but couldnt find it. I ended up finding a complete ball joint replacement at "The Truck Shop" in Orange, CA. The kit came with everything. Ball joint, castle nut, cotter pin, dust boot, and grease fitting for only $14.00. Its probably a good idea I replace them anyway.
*** Here are some before and after images ***

 double click images to enlarge
*** Ball Joint Seperation Steps(use at your own risk)***
1. Remove Wheel... duh!
2. safety measure - Secure spring to lower control arm using a thick chain. I made a couple loops around the coil and wrapped it snug to the lower control arm using a thick bolt, nut and washers to lock the chain. This will prevent the spring from popping out at you.
3. safety measure - Secure lower control arm by placing a floor jack underneath it. Do not lift the control arm just open jack until it is gently pressed up on lower control arm.
4. Loosen castle nut until top of flush with upper most ball joint thread.
5. Remove shock from lower control arm. Upper mount is removal is not needed.
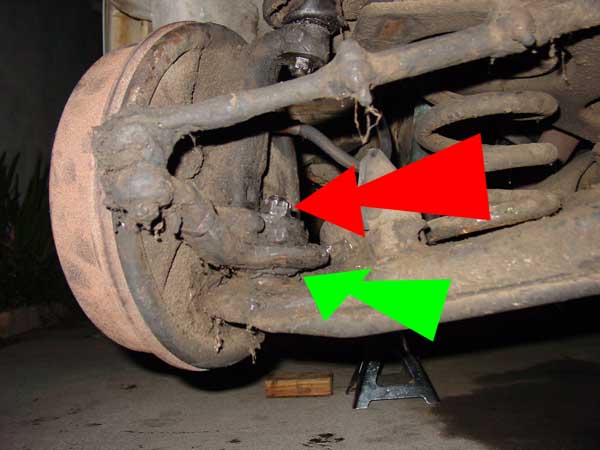
6. Wedge a pickle fork into the area shown by the green arrow. Then hit the pickle fork with a good BFH. You REALLY have to pound the sh*t out of it. Well, at least in my case.
2. safety measure - Secure spring to lower control arm using a thick chain. I made a couple loops around the coil and wrapped it snug to the lower control arm using a thick bolt, nut and washers to lock the chain. This will prevent the spring from popping out at you.
3. safety measure - Secure lower control arm by placing a floor jack underneath it. Do not lift the control arm just open jack until it is gently pressed up on lower control arm.
4. Loosen castle nut until top of flush with upper most ball joint thread.
5. Remove shock from lower control arm. Upper mount is removal is not needed.
6. Wedge a pickle fork into the area shown by the green arrow. Then hit the pickle fork with a good BFH. You REALLY have to pound the sh*t out of it. Well, at least in my case.
7. When you have done it correctly you will kind of hear it pop free. The castle nut should retain it from popping off completely.
8. Slowly lower the floor jack. Be careful, at this point the spring is wanting to jump out!
9. After completely lowering the floor jack my spring was now fully decompressed. It did sort of jump a bit but the chain held it from going anywhere.
10. You are now free to replace the spring.
--------------------------------------------------------------------------------------------

 disclaimer: I assume no responsibility for any problems you incure by following these instructions. The steps listed show how I performed the job, I do not claim it to be the "proper way" or "recommended way". Every vehicle is different. Use them at your own risk.
You should never leave your vehicle unattended while on jack stands. Children or adults can be seriously hurt or killed while playing near vehicle on jack stands. Vehicles can easily be swayed off of jackstands!
I shouldn't have to write all this but I did anyway!


