Monday, October 02, 2006

Sit Down and Shut Up!!


Started working on reupholstering my seats. I purchased covers and am having them put on professionally. I would have loved to do it myself, however high density foam sells for about $100 for the seat cushion and $50 for the backrest. I just paid $100 for someone else to do the foam work and seat cover installation.

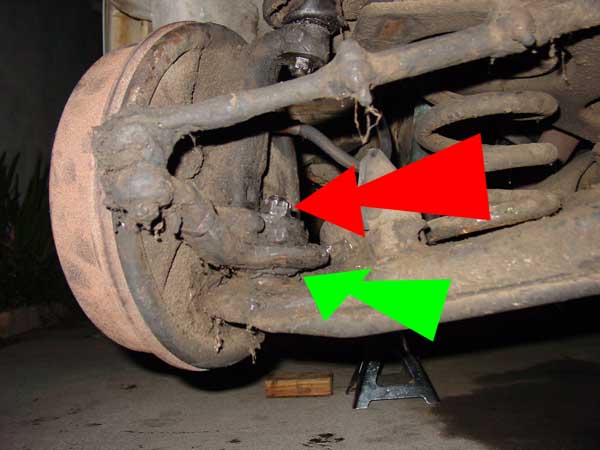
I did remove the old cover and foam padding. Of course, there was the dreaded broken side spring on the driver side. This is the outmost spring that pretty much holds out the outside of the seat cushion.

It looked like the previous owner had a spikey ass! That or he kept forgetting to remove the screwdriver from his back pocket on a daily basis.

I also bought my carpet kit. Both items of course will not be put on until I have finished painting the inside of the cab.

Ok.. Here is an update as of 10/28/06. The new seat covers are on. I kind of have mixed feelings about just getting them done entirely at a shop. However, its the shops fault because about 3 different shops could not just give me a quote in person. They ALL had to supposedly see the seats even though the shops have been around 20 years. They should know what this bench seat looks like... for crying out loud. All the seats are just about the same for chevy trucks 1960-1980ish. So...anyway, here are the updated pics.


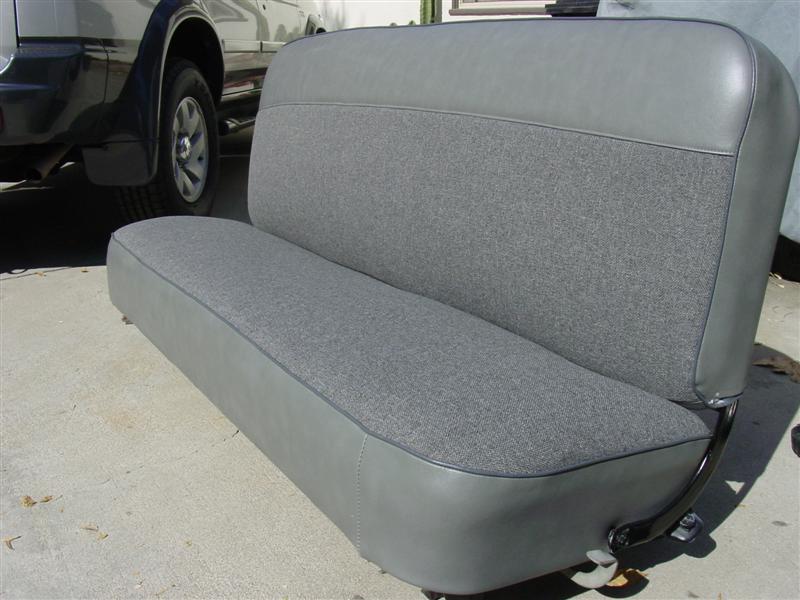
updated image of underneath seat....

Monday, September 18, 2006

Most Of Front-End Primered

Well, I finally got the bodywork and primer done for the better half of the front end completed. In the photos I provided the body parts are still not aligned as they will be after I finish the paint job. I just quickly pieced them for a quick runway photo shoot. lol.

As I mentioned before, I filled the hood and fender seams for a smoothed out look. I also filled all the body trim holes with lead.

I think Im gonna finish up the driver side door and roof. Then I will be removing my front and rear windows to finish up the cab. Man.. I cant wait until I lay the color down!


Posted by Picasa

Sunday, August 20, 2006

Primered Hood and fender


Im pretty excited. I got all the body work done on my hood and passenger fender. I was able to get a nice coat of etch primer followed by one coat of filler primer. I will definately be block sanding and applying additional coats of filler primer to get it nice and smooth. First I will complete the front end completely up to a first coat of filler primer. You can see I did not align the body parts yet, I just put them back on to please my neighbors.

Oh yeah, by the way... This would not have been completed today if it werent for the excellent help of my homie Ludguin "the Penguin" Trejo, aka SPINBAD. Thanks man! I owe you one. Power steering pump...??? HAHA. I gotta thank his wife for letting him stay at my house all day.

Heres latest pic...
Incase you didnt notice I will mention that I have filled the hood and fender weld seams so it can have a smoother finish. I put arrows to the weld seams that were filled along with a closeup.


-------------------------------------------------------------------------------------------

Almost forgot, my nice friends at Monroe hooked me up with a full set of shocks. Gotta love them lifetime warranties!

The fronts are in and I also finished some undercoating on my fenders. Pics of that will come after I complete the first stage of primer on the front end.

Sunday, July 09, 2006

Finally Lowered!!


After cutting a full coil off of the springs I estimate it dropped about 2-2.5 inches. Not quite what I was hoping for. I think 3 inches would be better but its ok, the cutting is only temporary until I buy the drop springs.

Before I was able to remove the springs for cutting I needed to seperate the ball joints. This process took me some time. FYI, ball joints that have been resting in place for over 40 years do not part so easily. It took me about 3 weekends of trying finally pop it. It also cost me my first city "Official Notice" due to the fact that I left the front of the truck on jack stands for that period of time.


I was told by many folks in the chevytalk.com forum that by using the pickle fork to seperate my ball joints I would most likely damage the ball joint dust boot. Thats perfectly fine right? I can always buy a new one.... WRONG!!! I looked high and low for a matching one but couldnt find it. I ended up finding a complete ball joint replacement at "The Truck Shop" in Orange, CA. The kit came with everything. Ball joint, castle nut, cotter pin, dust boot, and grease fitting for only $14.00. Its probably a good idea I replace them anyway.

*** Here are some before and after images ***

double click images to enlarge

*** Ball Joint Seperation Steps(use at your own risk)***

1. Remove Wheel... duh!

2.
safety measure - Secure spring to lower control arm using a thick chain. I made a couple loops around the coil and wrapped it snug to the lower control arm using a thick bolt, nut and washers to lock the chain. This will prevent the spring from popping out at you.

3.
safety measure - Secure lower control arm by placing a floor jack underneath it. Do not lift the control arm just open jack until it is gently pressed up on lower control arm.

4. Loosen castle nut until top of flush with upper most ball joint thread.

5. Remove shock from lower control arm. Upper mount is removal is not needed.

6. Wedge a pickle fork into the area shown by the green arrow. Then hit the pickle fork with a good BFH. You REALLY have to pound the sh*t out of it. Well, at least in my case.

7. When you have done it correctly you will kind of hear it pop free. The castle nut should retain it from popping off completely.

8. Slowly lower the floor jack. Be careful, at this point the spring is wanting to jump out!


9. After completely lowering t
he floor jack my spring was now fully decompressed. It did sort of jump a bit but the chain held it from going anywhere.

10. You are now free to replace the spring.


--------------------------------------------------------------------------------------------

disclaimer: I assume no responsibility for any problems you incure by following these instructions. The steps listed show how I performed the job, I do not claim it to be the "proper way" or "recommended way". Every vehicle is different. Use them at your own risk.

You should never leave your vehicle unattended while on jack stands. Children or adults can be seriously hurt or killed while playing near vehicle on jack stands. Vehicles can easily be swayed off of jackstands!

I shouldn't have to write all this but I did anyway!

Posted by Picasa

Thursday, May 18, 2006

New Wheels and Tires!!!

OK, I know its a little premature to be sticking these brand new wheels and tires on this baby but I couldnt pass up the excellent deal on got on them.

Heres the details:
15x8 American Racing Outlaw II's
offset -19
backspace 3 3/4
bolt pattern 6-5 1/2
Cooper Cobra Radial GT's
255/60/r15


 Posted by Picasa

Sunday, May 07, 2006

Cooler lines, Battery Dieing

Well, Finally completed my cooler line plumbing. The issue was finding the proper fitting for the flared end of the steel tubing to go into the npt threaded hole of the radiator. Very had to find this fitting ANYWHERE. I tried hardware stores, plumbing stores and of course auto parts stores. By luck of the draw I stumbled on this "pipe fitting wharehouse" and they had it all.

The Truck will start up and run, however I have not actually drove it. I have an issue with tons of white smoke coming out of my exhaust. Most likely coolant/water leaking from the head gaskets. Im gonna have to pull off my valve covers and re-torque the heads down. Hopefully its not gonna require valve adjustments.

Another problem is that if I leave the battery connected overnight it will be dead. Something is drawing current but I have not looked into that yet.

Im still anxious to start body work even though the truck isnt drivable yet. Patience are being tested!!!

Thursday, March 09, 2006

Mechanical Fan Install

FEBRUARY - 2006
*************************************
My LIL MAN
chillin'
in front of his truck

So I decided to go with a mechanical fan. I hear its better in the long run then electric. So I may loose a few HP's... oh well.

Here are a few pics from different angles during installation


nice pic from the sideview. I still need the upper radiator support bracket (hard as hell to find) and a new belt. The old belt just doesn't seem to fit anymore?? Maybe my crank pulley gained wait like its owner... haha!


Tuesday, March 07, 2006

So The Work Begins... (Floor Pans)

*** March 4, 2006 - SATURDAY ***So the work begins on the floor pans. I admit... this cab looks craptastic! But I promise it wont look like that for long! So I decided its time to get poppin on doing something about the inside. I first removed my butt-ugly bench seat so as to reveal the beautifully covered floor pans.
Ahh Yess... Floorpans covered beautifully in some sort of factory weather treatment. At first I tried to remove this stuff with a simple scraper spatula, but the adhesive kicked my ass. So, out comes the handy air-chisel!! That literally saved me lots of blisters and a fulls days work.
Yep.. .Thats me sitting on nuthin' but floor.
Time to start sanding down to the metal. Off with the adhesive residue and surface rust!!! Due to sunlight restrictions I was only able to get to the passenger side. Sealed it in etch-primer and followed up with regular primer.
-----------------------------------------------------------------------
*** March 5, 2006 - SUNDAY***
Well.. Sunday morning is here and I was able to finish all my sanding. I was also able to finish up the etch-primer and regular primer.


Wednesday, February 15, 2006

Liftgate / Bed Wood Removal

FEBRUARY, 2006

Well so much for the hideous manual liftgate!
its gone!! It was pretty painful to get it out being that I had to do it by myself. Thanks to my cherry picker and cut-off wheel on the grinder. I was able to cut off a few rusty bolts. The liftgate had to be dropped to the floor rather than lifted up. Kind of strange but it worked out better for me anyway.

So after the liftgate was removed I decided now was a good time to take out the wood. It came out pretty easy with the help of mr. crowbar. The wood was REALLY bad and mostly just feel apart. There are still a couple stubborn boards in there but I will get them out later.


Posted by Picasa